The Sewing Place

Show Posts

This section allows you to view all posts made by this member. Note that you can only see posts made in areas you currently have access to.


Messages - elisep

Pages: 1 ... 3 4 [5] 6 7 ... 9
61
In the wardrobe / Re: Chiffon Dress
« on: September 29, 2019, 08:19:42 AM »
Are you keeping the waist seam? Since you intend to wear it over a slip, if it were me, I'd leave the whole back open with a covered button at the neckline. That way you only need to do a narrow hem at the centre back.  But that may not be the look you're going for!
Looking forward to seeing what you make of it. I keep eyeing off that pattern, but I don't think high necklines are very flattering on me.

62
The Show Must Go On / Re: Queen Ravenna
« on: September 02, 2019, 09:56:37 AM »
Thanks for your kind words, everyone! I couldn't enter the best dressed competition as my company hosts the event; myself and a colleague pretty much organise everything between us. But I did get a few people saying I should have won!

I wore the collar pretty much all night - except for when we went out afterwards as I didn't think I'd get into the pub with it on.
It was very comfortable to wear, except in one spot where I hadn't trimmed back one of the feathers enough. And also very stable - it attached to the dress with the front wires slipping into a channel in the dress, and two pieces of elastic in the back with snaps that attached to snaps on the inside of the dress. I expected it to feel very flimsy but it was quite the opposite, and easy to wear!

63
The Show Must Go On / Re: Queen Ravenna
« on: August 31, 2019, 09:12:36 AM »
Well it's been ages since I shared any progress, and as the event has been and gone I thought I ought to give you all some closure!

I decided to criss-cross chain all over the bodice. Well I think I used about 15 metres of the stuff and regretted it about halfway through! I used a beading needle and hand stitched the chain down at each crossing.


No photos of this, but I made a 3/4 circle skirt in organza as an under skirt to give the skirt a bit more fullness. For this I stitched horsehair braid in 3 rows to give it some nice fullness.

The stencilled feathers looked a little dull once I had the chain on so I decided to glue gold foil on a random selection of feathers. This was a super messy job, I literally got gold foil all over the house (and the taxi and the hotel room on the night of our event!!)


At the last minute I decided to add another row of feathers at the top of my collar.

Unfortunately it turned out a tad assymetrical which I didn't really realise till I saw the photos!

Here's the finished project.


And finally a shot of my makeup and my crown!

The crown I bought was silver so I had to paint it over gold, I did about 3 coats of paint and it still didn't look right, so I crushed up some eyeliner pencil and rubbed it on the crown to make it look a bit older and grimier!

So there you go. A lot of work for a single night's event, but I got a lot of comments on it and I felt like a million bucks!

64
The Show Must Go On / Re: Queen Ravenna
« on: July 16, 2019, 13:21:07 PM »
Progress update!

Feathers have been sewn onto the organza, then organza hand sewn back onto the frame.
I used strips of organza gathered up to cover the bottom of the feathers on the collar and will have them coming forward to the front of the collar;


I decided the feathers needed a tad more gold to make them pop;


Now to finish the collar off I need to wrap the front wire in ribbon to hide the ends, glue lace onto the back, and sew down the final ruffles. Hopefully only 1 more evening of work there.

I've laid out the front and back and stencilled the gold feathers on;

(photo is of the front. forgot to take a photo of the back!). They're currently hanging to dry, I'll get a better photo once I've sewn the dress back together.

Still needing to do; the boning channels, the lining, the sleeves, and then the embellishment of the bodice of the dress! Phew!

65
The Show Must Go On / Re: Queen Ravenna
« on: July 12, 2019, 12:00:31 PM »
Another progress report!

My feathers arrived today (earlier than I expected) so I got to work painting them gold;

There's about a hundred there, I have another 50 unpainted. I think this will be enough though. I've painted them all differently, some with more gold than others, some only a whisper of paint. I didn't want them to look too uniform, I also didn't want them super super gold, I like how they've turned out mostly black with the light catching the gold.


I've wrapped the frame in black organza, and cut it down to size. I've removed that and once the feathers are dry, will stitch the feathers in rows on the organza. I'll probably need to use a little glue to hold them in position for stitching. I'm thinking that 1 layer of organza isn't enough, I'll probably do 2. I thought about iron on interfacing but you need to be able to stretch the organza around the curves of the frame so I think the organza will be better.

I've got a wedding this weekend so probably won't get much costume time, but if I'm back early enough on sunday I might be able to make some more progress. I'm so excited to see how the collar turns out!!

66
The Show Must Go On / Re: Queen Ravenna
« on: July 09, 2019, 13:54:28 PM »
More progress! I'm normally too tired to sew in the evenings after work, but I had time today to go and buy some wire, so I was excited to work on the collar frame!


Please excuse the terrible lighting, I couldn't get that to not-happen.
Wire is 12 gauge aluminium wire I found in the floristry section at the sewing & craft store. It's a bit more pliable than I think I really want, but I don't want to have to purchase online (and hope I'm getting the right thing). It will bend out of shape if it takes a bad knock, but it only needs to last 1 night anyway, and I won't keep it on all night. If it does get bent out of shape it'll shape back relatively easily.
I've stuck it together temporarily with masking tape and will go over it tomorrow with black electrical tape, and thread where the wires cross.
The plan from here is to cut organza to shape, then stitch the feathers in rows onto the organza. I'll then stitch the organza into place on the frame by hand. Then for the back, I'll glue black lace in place to cover up the messy areas. I'm hoping if I soak the lace in glue prior to placing it on, it'll dry hard and provide a little more stability.
The collar will attach to the dress using loops + snaps so that I can take it off when I get sick of it. I'll sew in a channel inside the front of the dress for the front wire to slide into - underwire casing will probably be perfect.

I'm still waiting on the feathers to arrive from ebay, so once I've taped up the frame I'll move back onto the dress. It needs to come in on most of the seams as I decided that I'd like it a tad more fitted through the waist and hips. So I'll make those adjustments next and then sew the boning channels in. On reflection today I'm probably going to leave the side seams until the week or two before the function, just in case I lose more weight (been steadily losing so it'll probably happen).

67
The Show Must Go On / Re: Queen Ravenna
« on: July 08, 2019, 14:51:16 PM »
I've finally made some progress!
After playing around with the devore paste and not getting a good result, I've scrapped that idea and will go for a different embellishment on the bodice. I also played around with gold fabric paint and a stencil, and have decided on gold feathers all over the bottom of the dress, probably graduating up the dress. I used mum's Scan N Cut to cut my own feather stencil, it worked quite well. 
After some deliberation I decided not to make the bodysuit underneath. I'll still do the lace sleeves, but just join them into the dress. Instead, I'm planning to use boning in the dress to help smooth out my lumpy bits! I'll probably put the boning in each seam, stitching together the seam allowances to create the boning channels.
The sleeves will be attached at the top and sides only, letting them hang straight down. Not sure how I'll embellish them yet. I'd also like to make shoulder rolls (a-la elizabethan style) as I'm going for a mix of medieval/elizabethan style lines (and it's a costume, why shouldn't I go all out!).

The best part of not using the devore paste is that I've been able to use poly velvet rather than silk. Much cheaper, and so much easier to work with! The pile is much shorter and I've not had any issues with it shifting while sewing (except when I attempted to put the zipper in by sewing against the nap, learned my lesson). I don't even have to baste the seams. The shorter pile also works much better with the fabric paint. It's a great fabric, a heavy velvet with 4 way stretch. It's giving me a great drape and is forgiving on the fit!

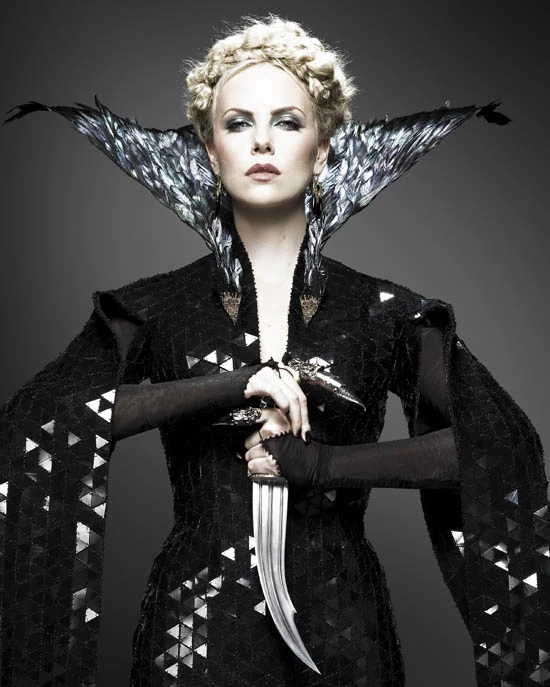
I've put the dress together, side seams and shoulder seams just basted for now. I need the dress to be made up so that I can use the neckline to create the frame for my wired feather collar/ruff. Once the frame is together, I'll take the dress apart at the side/shoulder seams, then lay it out flat for stenciling the feathers on. The collar is going to be tricky - I'm following a tutorial on making an elizabethan wired ruff I found online. Feathers are going to be black painted gold (too expensive to order gold feathers!)


Here's the base dress. I've pinned the hanging sleeve to see how it looks. It ends in a point which I'm not sure I love, I might make it a different shape. I've got plenty of off cuts of fabric due to how it was cut out!

68
Fun with Fabric / Re: Where, How and Why do you buy fabric?
« on: June 26, 2019, 13:33:49 PM »
What a fun topic!

Where - either from theremnantwarehouse.com.au online, Darn Cheap Fabrics, Rathdowne Fabric & Remnants or The Fabric Store - all are independant fabric stores, all of them carry unique fabrics, often end-bolts from designers. If I need a lining, plain cotton or something like that, I buy from Spotlight (chain store). I mostly use Spotlight for haberdashery and patterns.

How - generally if I see a fabric that speaks to me in some way, or I just immediately love it! Then I decide what to make from it. Less frequently I go out looking for fabric for a specific project, eg if I have a wedding to attend etc.

Why - I definitely have a bit of a shopping addiction, just mine is fabric and not shoes! I also have a "thing" for silk & wool fabrics... if I see one I like, I buy it, even if I don't know what I'd do with it! I get my inspiration from clothes I see on people around me, in movies and tv etc. I often try to recreate clothes I've seen on TV, or at least put my spin on it!

69
The Show Must Go On / Queen Ravenna
« on: June 14, 2019, 10:45:39 AM »
So each year in August the company that I work for puts on a gala dinner. The theme alternates between a black-tie-esque theme and a proper costume theme. Last year was James Bond, so this year, Comic-Con!  :D
Of course this makes me super happy as I love making costumes!
It's taken me about 3 months to make a decision, because I really just wanted to make everything! But I've finally decided upon Queen Ravenna - from Snow White and the Huntsman (also Huntsman: Winter's War).

This is my inspiration photo;

Though I am not doing a direct copy. I'd like mine to be black and gold (not silver).
I'm using Simplicity 1045 as my base to work from, with a few alterations.
Charlize's dress appears to me to be made from suede which will be much too heavy to wear for an evening of dancing! So I'm going for a black velvet and I'm going to have a play around with the devore technique to see if I can get it to work. And then use gold fabric paint to make some sort embellishment. I like the idea of gold stamped feathers all over the dress - she is a "raven" after all. If I can find an appropriate stamp that is.

I've also decided to make a bodysuit to wear underneath. Pattern for this is Simplicity 8670. I'm going to make it in skin colour powermesh covered in black lace - to get the idea of the black undersleeves, with a dual function of holding in all my lumpy bits!  :P

So the first step is to create the bodysuit! I've no idea how much negative ease will give me a reduction/smoothing out of my figure in the power mesh... and google is not really helping. The pattern appears to have a 1 inch negative ease at the bust for a C cup. So I think I'll start by cutting 1 size down, and do fitting adjustments on the power mesh as I go. I'm planning for a double layer of the mesh (at the very least, in the side front/back pieces) for extra sucking-in power! Hoping I won't have any issues using a stretch lace over the power mesh, too. 

70
Technical Help / Re: Dyeing silk dupion?
« on: June 02, 2019, 14:20:42 PM »
My only experience with dyeing silk was a raw silk I attempted to dye green. It turned out pastel green and very stiff! I only used a washing machine dye though. I believe you get better results from dyeing in a pot.

My only thoughts would be, that it is likely that the embroidery is polyester thread, which won't dye with the same dyes that work on silk. It might give a nice effect, or might not be what you're aiming for!

71
In the wardrobe / Re: Riding Habit
« on: May 27, 2019, 11:52:55 AM »
I've made this Suitability "Hunt Coat" - http://www.suitability.com/product_p/5004.htm
Which sadly appears to be discontinued. She also does a dressage jacket - http://www.suitability.com/product_p/5850.htm
however it has a waist seam, I don't think it would be overly difficult to cut it all in one. It apparently does have an option for a side saddle cutaway, however looks like it only has a centre back vent - wouldn't be difficult to make them side back vents.
The Hunt coat I made went together nicely, I did make a toile and had to make a couple of alterations - namely, the collar came up small so I added about 1.5cm all around, and it was a bit short so I lengthened it (and lengthened it again to make the side saddle version which has been waiting for the lining to be sewn in for around 5 years  >< )

Even better if you could find a copy of the hunt coat pattern kicking around on ebay or somewhere!

72
A bit of a 'do' / Re: Strapless Liberty-Print Dress
« on: April 24, 2019, 10:21:07 AM »
Spiral steel is not generally recommended if your bust is larger than a C cup.
I made myself a formal dress with a separate internal corselette made from Powernet. I'm not at home to double check right now, but I think I used a combination of spiral and flat steel. I definitely would have used flat steels at center back and the side seams, and definitely spiral steels over the bust for comfort. I just can't remember what I used at the side front and side back seams.
The dress was extremely comfortable to wear for a strapless, I didn't have to pull it up once. The corselette went down to high hip and waistline on the dress was at my natural waist. The powernet was definitely a big part of why it was so comfortable! I originally wanted to go full couture and use swiss net but it proved very difficult to find.

I don't really like rigilene for strapless dresses myself, I don't feel it offers enough support - this is just my preference.
Personally, if I was going to the trouble of making a corselette and all, I would use channels and boning rather than sew on rigilene.

Another option could be cable ties - I've used these successfully in toiles that I have made for various things, and in a pair of 18th century stays. Still need to sew channels for these but cheaper than using steel and then it would be safe to wash in the machine.

73
Patterns Discussion / Re: Pattern envy...
« on: April 24, 2019, 09:52:03 AM »
I agree that it's a beautiful pattern, I've got it and am halfway through a version in dusty pink linen.
The instructions for the fully-hand-tailored version are better than the machined version. I was following the machined version and found the instructions for the pocket/dart combo to be absolutely terrible. Switched to the hand tailored and worked it out.
Only problem is that By following one set of instructions, I've attached the facings to the jacket before attaching the lining to the facings (I did think it was strange at the time). But I don't like the order of instructions for finishing it this way so I need to work out how to switch to the other instructions.
I also made the mistake of fully interfacing the front with iron on interfacing. Terrible idea. If I make it again (and I have plans to, pending the fit and finish of this one) I wouldn't use iron on, I'd use something like silk organza or cotton poplin.
I've got a beautiful piece of pinstriped linen I'd like to make up in this, and would also love to make it up in a tweed or plaid type wool!

If I finish it I'll come back in here and update you all!

74
In the wardrobe / Re: Riding Habit
« on: April 18, 2019, 07:22:03 AM »
Following this project with interest! I'm a rider myself and have wanted a side saddle for years. Sadly, being in Australia I will have to get a custom made one, and I was saving for one when my older horse had to be retired. My young horse is still very green, but hoping to have a side saddle made for him in the next couple of years!
I have a half-finished modern habit that I really should get around to finishing. I've always wanted to make a vintage one, but assumed I'd never have anywhere to wear it (only the odd show offers side saddle classes, even fewer offer costume classes). At some point I'll just do it anyway for the joy of it!

I have, however, made a few vintage inspired costumes before. You'll really need to be prepared to toile the jacket multiple times I've found! Especially when you're wanting to fit something over a corset.

Will this pattern help you for the skirt?
https://reconstructinghistory.com/product/rh1016-1910s-standard-riding-skirt/

They also have an edwardian riding jacket pattern, if the Butterick doesn't fit your needs;
https://reconstructinghistory.com/product/rh1012-ladies-1910s-darted-riding-jacket/

75
In the wardrobe / Re: Buttonholes...
« on: April 15, 2019, 14:32:37 PM »
My huskvarna also starts at the bottom and goes backwards. It makes a neat buttonhole but it does make it difficult to physically see my markings to stop at the right point.
That, and I don't do buttonholes very often, so when I do them, I very often forget that it doesn't go forwards  :S
It's lucky I seem to have developed a habit of always working a practice one before doing any buttonholes!

Pages: 1 ... 3 4 [5] 6 7 ... 9